
Scrivener Quick Tips: A Roundup of Handy Features
By Gwen Hernandez | April 30, 2020 |
 Whether your home office has been invaded and you have little time to write, or you suddenly find yourself with nothing but writing time, I’ve pulled together a motley collection of handy features that every Scrivener user should know about.
NOTE: When the process differs between versions, I’m using S1, S2, and S3, to denote Scrivener versions 1, 2 and 3, respectively.
Quickly Moving Documents Between Projects
Want to add a file to a project that already exists in another project? Simple. Open both projects, adjust the windows to see both Binders, and drag the desired files from one project’s Binder to the other.  The files are copied into the new project, unlinked, so changes in one will not affect the other.
I love this for sharing general writing resources, research, and even scenes between projects. It also makes it a cinch to add the book files from a novel project to my series bible.
Duplicating Files within a Project
To duplicate an existing document or folder, select the desired files and go to Documents>Duplicate. If you’ve chosen a folder or document that contains subfiles, you can choose to include them or not.
I use this when I want to recreate an existing file structure easily, or to duplicate a blog post that I plan to update with new information.
Grouping Files into a Folder
Did you know you can quickly group a selection of files into a new folder? Just select the desired files and go to Documents>New Folder From Selection (S3) or Document>Group (S1/S2), then give the folder a name. You’ll need to click the arrow next to the folder to expand it and see its contents.

I like to write in scene documents and then group the scenes into chapter folders after I’ve completed the first draft of the manuscript. This is much faster than manually creating each folder and dragging files into it.
Matching the Destination File’s Formatting when Pasting
To match a document’s style when pasting text into Scrivener, use Edit>Paste and Match Style, instead of Edit>Paste.
TIP: This will obliterate italic, bold, and underline formatting in the pasted text. If that’s a concern, try the next option instead.
Applying Default Formatting to a File
Whether you’ve imported a file or pasted a section of text from elsewhere, you can reformat it to match Scrivener’s default, without losing italic, bold, or underline formatting. Here’s how:
Click in the text of the document and go to Documents>Convert>Text to Default Formatting (S3) or Documents>Convert>Formatting To Default Text Style (S1/2).
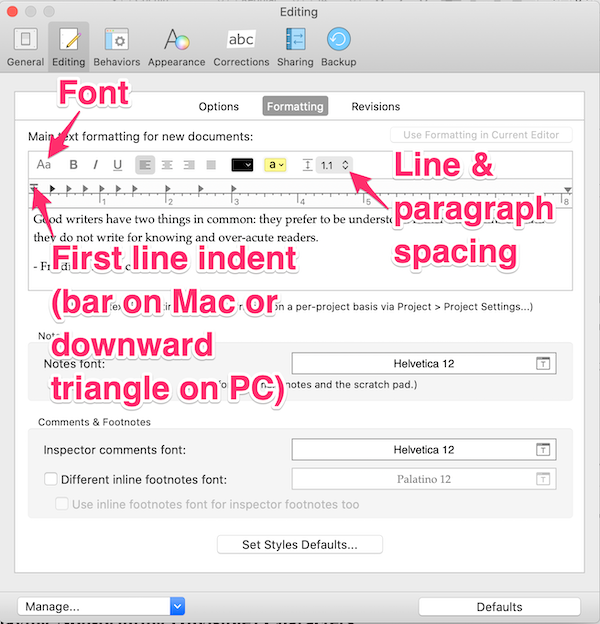
TIP: If you don’t like the default formatting, you can change it under Scrivener>Preferences>Editing>Formatting (S3), Scrivener>Preferences>Formatting (S1/2 Mac), or Tools>Options>Editor (S1 Windows). Make adjustments to font, spacing, etc in the mini Editor. The new settings are applied to any new documents you create, but must be manually applied (as described above) to existing documents.
Displaying Non-printing (Invisible) Characters
If your format doesn’t come out right when you compile, or our not sure why it looks weird on the screen, it may be helpful to check the invisible characters to see what’s going on. For example, maybe you accidentally started a paragraph with a Tab, or started writing your text in a table, as shown in the image below.
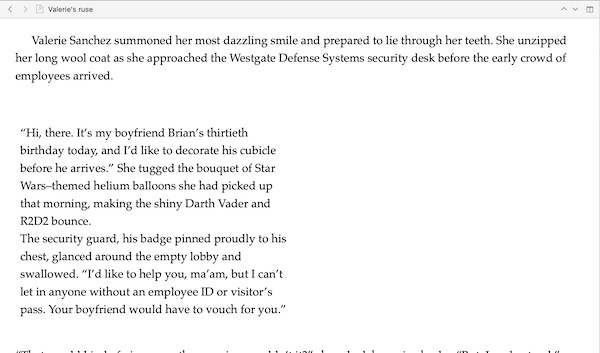
You can show non-printing characters by going to View>Text Editing>Show Invisibles (S3) or Format>Show Invisibles (S1/2). The invisible characters show up in blue. Below is the same document with invisibles displayed.

To turn them off, repeat the step above but choose Hide Invisibles.
Splitting a Document
If you want to break up a document into two, simply click where you want to “cut” and go to Documents>Split>at Selection.
This will end the original document at the cut point, and create a new document (below it in the Binder) with the rest of the text.
I’ve found this helpful for splitting off parts of scenes I no longer want (but want to keep somewhere) or to divide up old work that I imported.
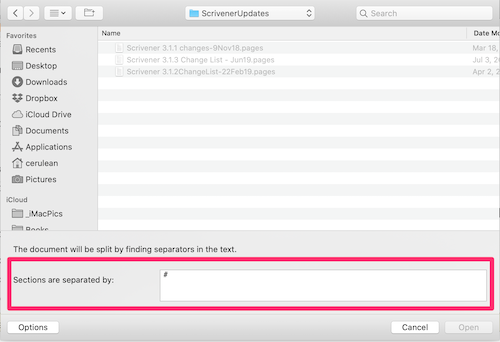
TIP: If you have recurring section or chapter dividers (e.g., the word Chapter or a #) in a file you plan to import, use File>Import>Import and Split to automatically split the file into multiple documents at the corresponding characters.
Merging Documents
If you want to join two or more documents into a single file, you can do that too. Select the documents to combine and go to Documents>Merge.
They will merge under the name of topmost document in the Binder, and will include all documents’ synopses, notes, references, snapshots, and comments.
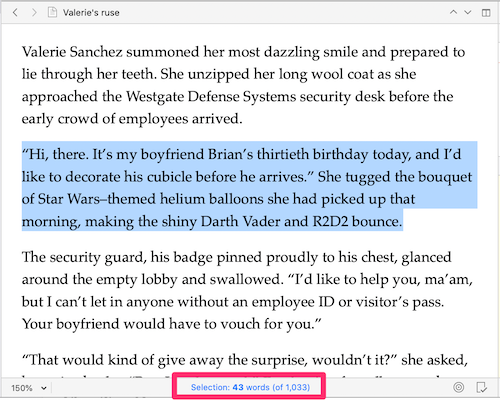
Find the Word Count of a Text Selection
On Windows, highlight the desired text and right-click it. The word count will be at the bottom of the contextual menu that pops up.
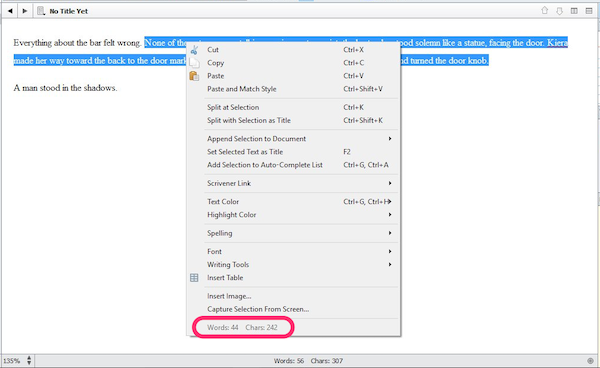
On a Mac, when you highlight a section of text, the word count at the bottom of the editor changes to show the selection word count (and color of the word count changes to blue).
Viewing Two Documents at the Same Time
Split screen lets you view two items side by side. Click the little square button at the upper right corner of the Editor pane to split the screen. (Windows users can choose horizontal or vertical. Mac users can hold the Option key to toggle between horizontal or vertical.)
Initially, you’ll see the same file in both panes. This might be useful to refer to a different section of the same document.
Click in either pane to make it “active” (the header turns blue). Then, choose a file in the Binder to view it in the active pane.
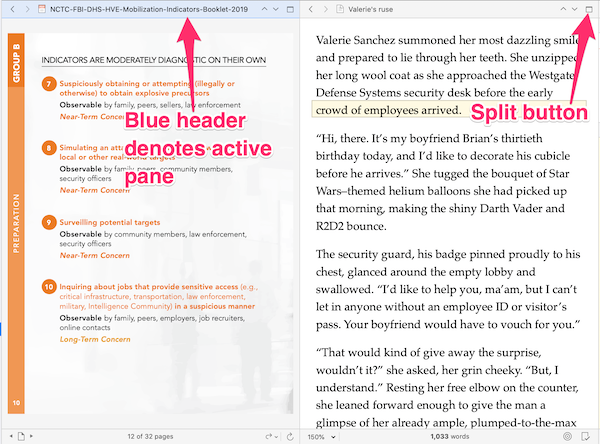
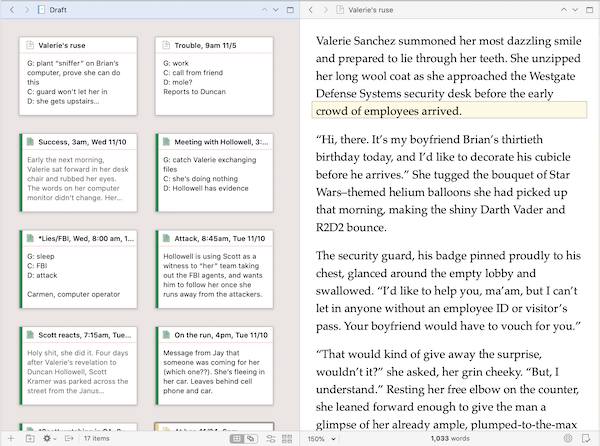
This is great for referring to research documents, images, scenes you’ve previously written, or even the Corkboard or Outliner (if you select a folder or group of files), as shown below.
To exit split screen mode, click the split screen button on the pane you want to keep working in.
Quickly Exporting a Document (or a Few)
When you’re ready to export your entire manuscript, you’ll want to use the Compile feature to, well, compile all of your documents into a single output file. But, if you just need to export one document or a chapter, there’s another option.
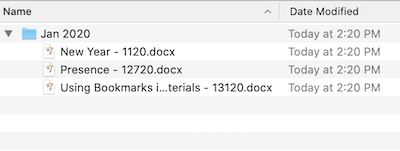
Select the document or folder to export and go to File>Export>Files, and choose the file type you want (e.g., DOCX, RTF). Files will be formatted as they are in the Editor.
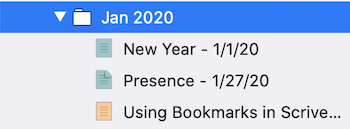
If you choose more than one document, each one will be exported as a separate file. If you choose a folder (as shown in the first image), Scrivener will export each subdocument individually, but retain the folder structure (as shown in the second image).
I hope you find these tips helpful. Stay safe and healthy!
Got any Scrivener questions for me? Hit me up. I’m here all day. ;-)
[Coffee]
Gwen Hernandez (she/her) is the author of Scrivener For Dummies, Productivity Tools for Writers, and romantic suspense. She teaches Scrivener to writers all over the world through online classes and an extensive library of blog posts. Learn more about Gwen at gwenhernandez.com.


I know I’m not using Scrivener to it’s best abilities, and when I read your posts I’m always amazed at the different tasks you highlight. This book, I’ve used a big notebook for all the pre-writing tasks, but next book I think I’ll try learning how to use Scrivener better before starting. At this point in the process the notebook is cumbersome and I’m having trouble finding things in it.
My question for you is that I seem to have lost huge chunks of chapters of a past book. I didn’t delete the chapters myself. I was copying and pasting and some of the chapters just disappeared. I didn’t realize it until a good while later (like at least a month.) I tried to look around and see if I could find them in Scrivener, but couldn’t figure out where to go. I know it backs up after every session, so are the chapters just gone, because it backed up the version where the chapters are missing? I’m lucky because I have the chapters on Wattpad and can copy and paste them back, but it would be a lot easier to just find them on Scrivener if I can. Thanks for your help!
Hi, Lara. It sounds like Scrivener would definitely be helpful for future projects if you’re getting to the point where you can’t find things in your notebook! The search features are robust enough that even if you’re not perfectly organized, you can probably find what you need.
As for your missing chapters, here are a few options.
– Check is the Trash folder within the Scrivener project to see if you accidentally deleted the files.
– Do a project search for a word or words you know are in one of the missing files to see if it got moved somewhere unexpected (like within another chapter or document).
– If the files are truly not in the project (i.e., you deleted the text instead of the documents/folders), they might be in a backup copy if the deletion happened recently enough that you still have a version from before it happened. So, if you deleted the files two Scrivener sessions ago, I’d expect the missing files to be in the three copies that are older than that. Go to Scrivener>Preferences (Mac) or Tools>Options (Windows) and click Backup. Click the Open Backup Folder at the bottom to see your backup files.
Good luck!
This may be the same problem I’ve encountered. Sometimes when I try to combine two files into one, the first gets erased/overwritten. It must be the way I’m dragging/dropping one file onto the other, but it’s made me quite paranoid. Thanks to your tips, Gwen, I will instead use the merge option. PS to Lara: Scrivener has a few quirks (like this one), but it is a fantastic way to keep track of lots of moving parts and docs and definitely worth a time investment. (And Gwen’s tips are the best around!)
I’ve used it for ten years now, but with such big gaps between projects that it’s like learning it all over again. I seem to be on a more stable writing path lately, and am hoping I’ll be able to only have to relearn this one last time. :D
And agreed, Gwen’s tips are awesome!
Hi, Carol! I’m glad this had some useful tips for you. Generally, dragging/dropping one file onto another should only create a subdocument, so maybe that’s where your confusion is? Unless you’re dragging/dropping text itself from one doc to another, then I could definitely see how overwriting could happen. Anyway, merging is so much easier. ;-) Thanks!
Thanks for the ideas. I’ll look at it after work!
Absolutely, Lara!
You aren’t going to believe this, but I went and looked at both of the drafts I’d saved and both had all the chapters. I am so confused… Anyway, I now know where the trash can is, how to search for files and check the back up, so thank you so much!
Weird, Lara. I hate not being able to figure out why something wasn’t working as expected, but I’m glad you found your files and have acquired some new skills!
Thank you for your helpful columns! I have a question about default formatting related to bullets (S1). I used your directions to format my normal default text but I can’t find where to change the default bullet styles. For some reason my first bullet level is set to -.5 for an indent and the following levels are all strange, too. I don’t remember ever having changed those but it seems strange that Scrivener would have those as defaults. Thank you!
Thanks, Michele! Did you import or copy/paste the text with the bullets? I find that they can get screwy sometimes (even if not copied in).
One option to try is to select the bulleted list, click the bullet list in the format bar, and choose None (or this should be under the Format menu too). Then reapply the bullets.
If that doesn’t help, you can also turn on the ruler (Format>Show Ruler) and adjust each bullet using the indents and tabs, but that’s annoying. ;-) Usually the first option works for me.
I don’t believe Scrivener allows you to change the bullet list defaults. They just pull from the formatting of the document they’re put in. HTH!
Thanks for getting back to me so quickly! I can’t remember if I imported that text but I tried in a new project and it’s doing the same thing. I guess maybe I should set up one document that has all the bullet levels the way I like them then copy that into whatever I’m working on. Thanks again!
Michele: Some of it might come from your default formatting (which doesn’t directly address bullets), so that’s also a place to start. But otherwise, if you have a particular appearance in mind, your idea sounds good!
Thanks for today’s selection of handy Scrivener tools! Some I knew, some are new (sorry, weak pun!).
I have a special folder in my Notes, titled “Scrivener”, where I copy (parts of) your articles for later reference! :-)
LOL, glad I was able to show you something new, J!
the ruler is not under format. i cannot write without it! D:
Abigail: If you’re using Scrivener 3 for Mac, the Ruler is available via View>Text Editing>Show Ruler. If you’re ever not sure where something is, you can use the search bar in the first line of the Help menu to find any menu item by name. HTH!