
A Display Hack for Your Story’s Outline
By Jan O'Hara | April 19, 2021 |
 I recently finished drafting the most challenging book I’ve written to date. Not only did it require the highest word count and psychological complexity I’ve navigated thus far, but its writing period spanned several years and became punctuated by numerous pauses, some stretching out for months at a time.
Paradoxically, I felt an urgent need to complete this story, and each time I returned to it, I chafed at the lengthy but necessary reimmersion period. I wanted to leap into laying down new track, dang it. Not spend my time refamiliarizing myself with who did what to whom, and when.
But hey, necessity is the mother of invention, right?
In the end, I developed a tracking system that allows me to dive into a scene while also being able to see at a glance where it lies within the larger manuscript. Essentially it replicates the functionality of a plotting board, plotting cards, or a tabled outline, but in a linear format.
Below are screenshots of a demonstration murder mystery, along with the key to what I’ve decided to track. I’m sharing them with the understanding that:
- You should feel free to adapt it to suit your own writing style and particular manuscript’s needs, or disregard it altogether. In reality, that’s all I did; I simply collated ideas gleaned from others into a new format that works for my brain.
- This will likely be most helpful to pantsers, quilters, or more organic writers. i.e. Those of us who write like we’re sitting at the center of spider web, and who need to see how all parts of book will be affected if we tug on a certain thread of silk.
- If you are a plotter, linear writer, or are advancing your WIP at a steady pace, for goodness sake, don’t divert your energies into organizing along these lines! But later, if progress stalls or when you’re in the editing phase, you might find this a useful tool.
- While I’m sharing screenshots of a Scrivener binder (Windows version), the textual features would certainly work in Word’s outline feature as well.
Without further ado, here we go…
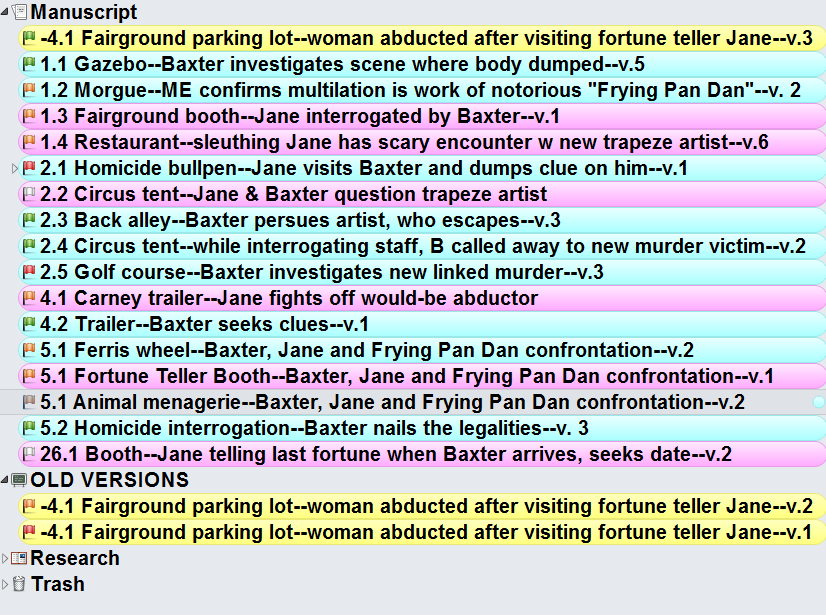
Screenshot of Scrivener for Windows Manuscript Binder (click to enlarge and open in new window)
Tracking Point-of-View (POV) Characters
If you’re writing in more than one POV, you’ll want to ensure you’ve introduced pivotal characters at appropriate times in the manuscript, then staggered their viewpoints at the necessary intervals.
In this image, it’s easy to see POV distribution at a glance. I’ve gone with yellow background for the murder victim’s viewpoint, stereotypical pink for the female protagonist’s, and blue for the male’s. (In the Windows version of Scrivener, display label colors in the binder by going this route: View > Use Label Color In > Binder.)
Stage of Completion
 Using icons of colored flags, you can indicate how close a given scene is to being finished. A white flag means it has yet to be written. Red indicates it’s in bad shape. Orange, that it possesses a few clunky areas. Green, that it’s solid for this stage of writing.
I find this cue handy when I sit down to write and am not necessarily in the frame of mind to draft new words. I can zero in on a yellow or red scene and tackle edits for a time.
Also, it breaks down the book into bite-sized goals and creates a visual reward for completing one step. It’s surprisingly gratifying to change an orange flag for green.
Keep Track of Timelines
Binder Day and Scene Designations
Historical writers know how easy it can be to paint yourself into a corner by having a character meet another figure before they were actually born, or failing to account for travel time, etc. Contemporary writers also need to track the passage of days.
I tend to write books that take place in a compressed period. By tracking the date or number of days elapsed, I ensure items occur in a logical sequence, and that they’re appropriately paced.
I like to use a numeric system for each scene, coding them like this: #day.#scene for that day.
In the image above, see item -4.1? That’s a prologue that takes place four days before the main storyline begins. As there is no scene -4.2, it’s the only scene to occur on that day.
Day 1 is where we meet our two main characters, and contains four scenes.
And scene 26.1? It’s an epilogue that wraps things up a full three weeks after the main storyline has concluded.
In keeping with the generally tight pace of crime fiction, the bulk of the storyline takes place over a five-day period. But, oops! Notice that I’ve got a fair bit of action occurring in days 1 and 2, but no scenes planned for day 3 and barely anything for day 4. Going forward, I’ll need to address that strange gap.
Scene Location
Tracking this allows you to avoid repetition, especially if scenes routinely take place in nondescript settings. (Though why would you choose to insert your characters into boring locales?) By routinely varying the location, you can create a sense of movement and liveliness.
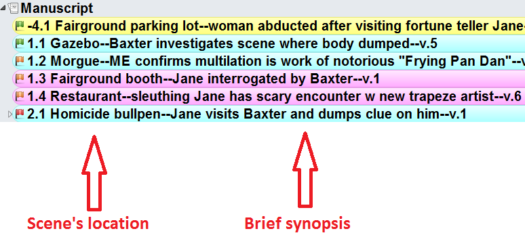
Brief Synopsis of Events
By including this in your scene’s description, you will find it easier to make corrections, eliminate repetition, and track plot and character arcs at a glance.
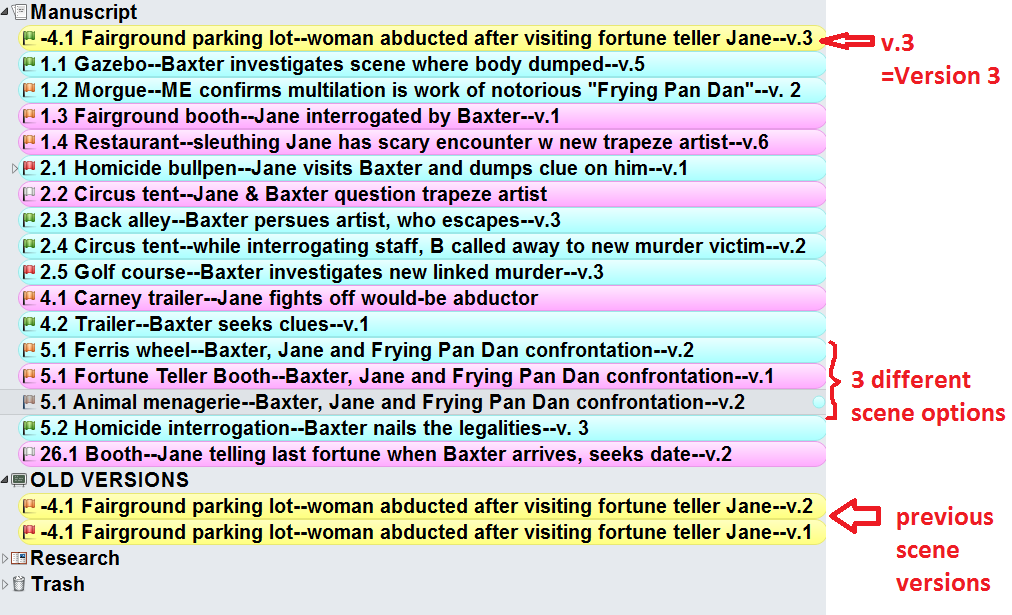
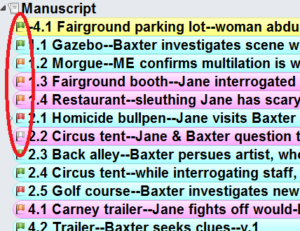
Scene Versions and Forks in the Road (Click to Enlarge)
Track Forks in the Road
In the image above, did you notice scene 5.1 lists three options for the climactic scene, each taking place in a different location?
Sometimes I’ll reach a fork in the story road and can determine which way to go at the level of the outline. Other times, I’ll need to rough-draft each scene first. Either way, the binder allows me to organize and visualize the possibilities.
Track Your Scene Versions
I’ve never mastered the snapshot feature of Scrivener, so this is likely an unnecessary hack, but I like the idea of preserving individual scenes in their various iterations. That way, I can easily return to a previous version if I discover I’ve overwritten superior text, or zigged when I should have zagged.
To accomplish this, before tackling any significant change, I first duplicate the scene. The newest version gets a higher “V” number, and older versions go into the folder specifically designated for them.
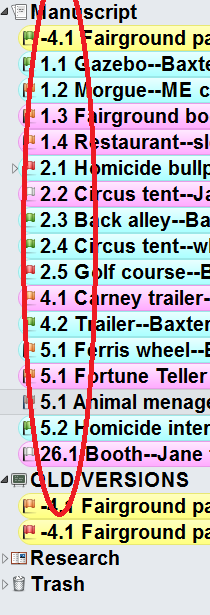
Put it all together, and this is the result: a basic outline visible alongside the scene you are currently writing.
Story forest PLUS story trees.
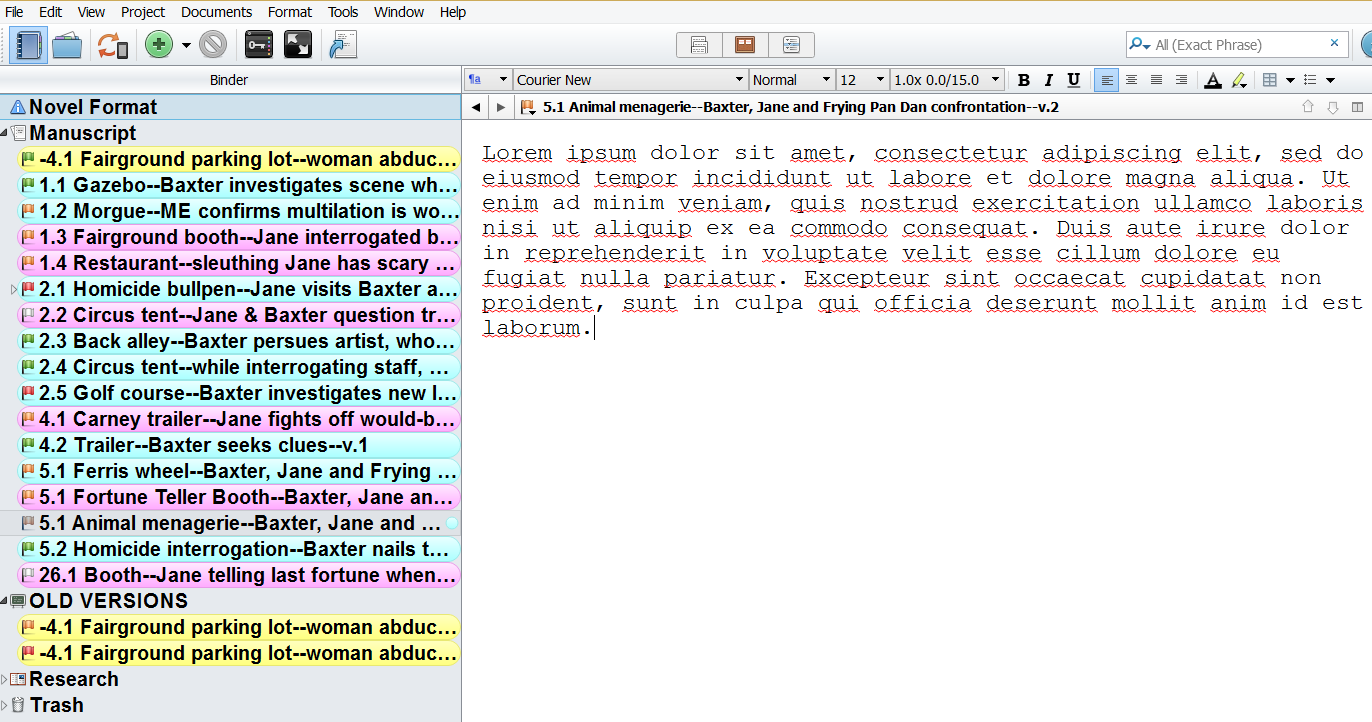
Scrivener Binder AND Editor on One Page (Click to Enlarge)
Now over to you, Unboxeders. Does this open up any possibilities for you? Do you bother to track any of the above? If you do, what’s your preferred method?
[coffee]
A USA Today bestselling author, former family physician and academic, Jan O’Hara (she/her) left the world of medicine behind to follow her dreams of becoming a writer. She writes love stories that zoom from wackadoodle to heartfelt in six seconds flat: (Opposite of Frozen; Cold and Hottie; Desperate Times, Desperate Pleasures). Her latest Christmas novella, The Cowboy’s Comeback Christmas, is part of a 9-author-strong anthology (A Cowboy This Christmas: A Sweet Romance Anthology). She also contributed to Author in Progress, a Writer’s Digest Book edited by Therese Walsh.


It’s fascinating to see the different approaches that people take to keeping track of their WIPs! I’m in awe of what you’ve offered here, although (as a non-computer type) it does make my head spin :-)
What stands out for me the most, actually, are two images you use at the beginning. One is the image of a quilter, and the other is “those of us who write like we’re sitting at the center of spider web, and who need to see how all parts of book will be affected if we tug on a certain thread of silk.” That is exactly what it’s like for me, and I don’t think anyone has ever captured it as perfectly as you just have in those two perfect images. I have my own idiosyncratic way of keeping all those moving parts in view and watching how a shift in one means a shift in the others—much messier than the elegant system you offer and no doubt incomprehensible to anyone but me! I’m sure your post will be a keeper for many people in our WU community!
As long as you have a system that works for you, Barbara, that’s what counts. I like analog for brainstorming–note cards, sticky notes on plotting boards, paper charts… The whole shebang.
Once the story begins to take on shape, though, I find this to be more compact and portable than an analog system.
Jan, thanks for this. As a pantser I’ve spent much of the winter trying to outline, with some success… and recently stumbled onto a kind of written synopsis that has improved my progress. But I have never quite figured out a Scrivener approach that works so well, especially your scene/day #ing scheme! As things shift (scenes move forward and back) it gets harder to keep track of what happened when in relation to everything else. I will definitely adopt this approach! One question: Why do you use the binder this way instead of leaning more on the outline view? (I’ve never gotten that to work effectively for me, but it looks quite similar to what you have here.) Thanks for sharing your process!
Carol, if this gets you closer to what works for you, I’d be delighted! But to answer your question, unless there’s a hack I’m missing, you can’t display both the outline and scrivening page at the same time. (I’m happiest when I can see both simultaneously.) Plus, the outline takes more horizontal room than this system.
I’ve used paper outlines in the past, but you can’t shuffle things around. Their permanence makes them clunky. Plus, this system is so very portable.
As soon as I started numbering scenes this morning, so many things became clear! And I realized that one of my main frustrations with the outliner was exactly what you suggest; wanting to see the outline AND the scene at the same time. Thanks for this, already helping.
You’ve made my day, Carol. Thanks for letting me know.
Jan, I’ve never used Scrivener, but is it possible to see both pages at once by opening your browser twice and then opening up the outline in one browser, the scrivening page in the other, and placing them side by side or on two different monitors?
This may not work; just throwing it out there. I’m a certified techno-peasant and have used this method for other purposes.
Anna, it’s a good thought! It won’t work the way you described, but I was just able to open two Scrivener windows in parallel and see the outline in one of them. That said, it requires more horizontal space than my method. And unless I’m missing something, I can’t modify it when viewed that way. Maybe that’ll be different in the upcoming Windows version, or already is in the iOS version, for all I know.
Love this, Jan! Just so you and other know, you can actually view the Outline and Scrivenings side by side if you use the split screen option. I have a post on it here: https://writersinthestormblog.com/2019/03/scrivener-split-screen-magic/.
I also use the file name to do a lot of work, putting in things like Wedding, 11am Mon 4/19 beach, and use Label colors to denote POV.
Thanks for sharing!
Thank you, Gwen! If I hadn’t switched topics and been typing this up late last night, I might have thought to ask for your expertise. I’m not sure I’ll change what I’m doing now that I’ve got a system, but this is good to know. I’m sure someone here will choose to use it.
As for your granularity re time, I can see that making sense, especially if the timing’s that crucial. More to ponder. Thanks!
This is a great share! Thank you so much! I could have used such a wonderful organizational tool about 2 years ago when I was going through a massive R & R. Totally amazing.
Right now I’m in the homestretch of a semester for my master’s degree that leaves little to no time for writing, but come summer I’m going all in and this hack is going to help me so much!
Thank you again for sharing your insights! Quite valuable!
I’m delighted, Amelia. Thanks for letting me know. And good luck with that last semester. So exciting! If you feel like sharing, I’d love to know what you’re studying.
Jan-this organization is awesome – POV, time, and state of completion at a glance and independently sortable. I actually created a relational database to try to track the outline one really complex project but that was a lot of work (and time). Setting this structure up is perfect for fits-and-starts writing, because it is the web the writer needs to climb to get back into the central webmaster ‘position.’ THANK YOU!
My pleasure, Jeanne. If this allows you more time to write, I’m all for it.
That’s very similar to a system I use, right down to color coding by POV character! Great minds…
No kidding! Well, what do you know.
Thank you so much for this post. I now feel as though I’m not wrong. Your process is also how I plan my books. With all the articles online about how to write a book (especially the ones that say “You must do it MY way or you will NEVER write a book that sells), this is the first that gave me a very needed pat on the back for thinking a little outside the box. One item of yours that is different from mine is the colored flag. I will be adding it to my format so when I don’t have a “new-word frame of mind” I can still be productive.
In the old days, and I mean decades and decades ago before computers, I used to type my ideas about a story, cut them into strips, move them around until I had a “strip outline,” making sure all the strips were weighted in some way so they didn’t get blown off my dressers, tables, and desk before I could type them again into a structured outline. (To brag a little, I sold two short stories to Hitchcock’s magazine using this process.) When I got a computer and saw how easy that same process could be, I was positively giddy. Reading your post made some of that same feeling come back. Thank you.
Laurie, I’ve done the printing-and-moving bit! Just did it for the WIP, as a matter of fact. I had an important conversation where I couldn’t get the flow or order right until I could move the pieces around, like a puzzle.
I have a digital way of doing this now that I might share in a future article, but it wouldn’t work for this scene. So back to paper I went.
From someone who likes to learn from others , if I could share one piece of advice, it’s to be open-minded but trust yourself to know what’s right for you and your writing. There are many quilters/spiders out there, I promise you. We are no more “wrong” than a person with ADHD is ill. We just approach the subject material at a different angle.
Happy writing! And if I helped make that process a tiny bit easier for you, I’m delighted.
I like this Jan. It’s compact and gives a solid overview of the story and the story details. Like a novel at a glance. You can pause and go deeper on any element and then zoom back out. I’m going to use this. Thanks.
I hope it helps, B. Happy writing!
This is wonderful, Jan! One of the challenges I wrestle with, continually, is that need to see the big picture all at once–because that’s how my brain wants to keep track–when early on the big picture isn’t all there yet. And while right now I’m still in analog mode (working on paper, longhand, as I always do for initial planning and drafting), this helps me see a way to transferring things into Scrivener eventually. I’ve tried a simpler version of this, but I let the small size of the left-hand column determine what I could fit rather than resizing it to include MORE information! So thank you for suggesting that I could actually change the size of the box. ;-)
I have tried doing an outline like this in Excel, but then it’s in a different box than the Scrivener notebook, and I didn’t like juggling both. Nice to think of a way to put the chocolate and the peanut butter together, as it were.
Also, I agree with Barbara: absolutely love the spider web analogy…it sums up so well that interaction between big picture and details as I work.
Alisha, I tried the Excel trick and had the exact same problem. I hate toggling!
In the early stages, have you tried a plotting board, using different colors of stickies for different scene aspects? (One for POV, location, backstory reveal, etc.?) I’ve discovered that’s my favorite route when I begin to write a book. Then, as the story gels and when I need something that’s portable, I convert it to this process.
I’ve been wanting to try a plotting board, but in the current apartment there hasn’t been room…in a couple of months, however, we are moving and I’m already planning to put one up in my writing space. I can’t wait to try it out!
A plotting board as reward for moving? You must be a writer. ;-)
Jan and Alisha, you are making me want to read more about the plotting board! I’m not a Scrivener person, but I think I could handle paper and and a board–and it might be fun to try! Right now I just keep a long running document of ideas and … I can’t say it’s the best system, especially since my current draft has the same day happening twice (it’s Tuesday, and then it’s Tuesday again…)
Heather, maybe you want to follow Gwen’s lead and add in a calendar date, even if the reader won’t see it?
Have you seen a plotting grid/board? Google “Alexandra Sokoloff plot board” and sort for images. You can get a rough idea of how they work.
Ooh, Jan – I love this kind of organizational stuff! I’ve done some similar things, but not as well thought-out as this. VERY useful. Like you, I find keeping a whole book in my head pretty much impossible, so I find it crucial to have some kind of roadmap.
I haven’t done a multiple-POV book, so I never thought of your male/female color-coding. But I usually make sure I list the main characters who appear in each chapter, and sometimes will highlight their names in different colors so I can visually track how frequently they each are appearing in the story. I’ll sometimes do the same for recurring literary devices or plot points, to get a high-level visual cue on how they are distributed. I also add the word count at the end of each line. Not that all my chapters need to be the same length, but if I see that most of my chapters are 3,000 to 4,000 word, but I have one 9,000-word chapter, I’m going to check for opportunities to split that chapter up, so that it doesn’t feel like I’ve slowed the pace.
The one area where I’ll disagree with you is on this point: “If you are a plotter, linear writer, or are advancing your WIP at a steady pace, for goodness sake, don’t divert your energies into organizing along these lines!” On the contrary, I think this would be highly useful for plotters and pantsers alike. Thanks for sharing your bag of tricks with us!
Keith, pantsers are welcome, too!
I like those other things you are tracking. For whatever reason, those come organically to me. And chapterization–if it isn’t a word, it should be–is something I figure out after I’ve got the right scenes in place. They almost always track at 2500-4000 words, and if they don’t, I rectify that tout suite. Scrivener is an awesome processor for being able to see how the individual parts work within the whole.
Do you use a digital outliner for your process? If you don’t mind me asking, which program? (I’m similarly fascinated.)
Currently I just use Microsoft Word for outlining, creating a one-page document with a single line for each chapter. These lines are usually very terse, and contain only enough info to make sense to me, plus the info I described above.
For my new WIP, I wanted to try some kind of digital corkboard function, but the Windows version of the corkboard in Scrivener lacks the flexibility I wanted. But I did some digging, and learned that the same people who make Scrivener offer a brainstorming app called Scapple for only $18, and now I use its most basic functions to mimic the freeform board that I want. It’s nice to see the scenes laid out like that, but I will still be using my Word outline as well.
Neat! I’ve been tempted by Scapple a few times but ended up sticking with butcher paper, note cards, or stickies. Thanks for sharing.
Jan, this is so completely opposite to how my brain works that I am wildly intrigued. I’m going to save it for when I am drafting my next book. Thank you!
Really, Liz? Too funny. I’d love a peek inside your process. Maybe a future blog post as a counterpoint?
How did you set background colors? I don’t see a way to do that, but I’m working in the Windows version of Scrivener.
Ellis, forgive the phone screenshot, as it seems to be the only way to show you, but here’s a brief demo.
https://staging-writerunboxed.kinsta.cloud/wp-content/uploads/2021/04/Binder-Label-1.jpg
This is the Windows version of Scrivener, so we should be in sync in that regard.
I’ll echo many of the comments above as to how much food for thought you’ve given us. I picked up so many ideas in your remarks that I’m bookmarking this one. I may not incorporate them into my current WIP layout in Scrivener, but certainly rereading when I start the next one. Thank you for all the details you’ve shared with us!
My pleasure, Brenda! Thanks for letting me know.
Hi Jan. Although I have always used a story board, and I color code my characters, I found your tracking system interesting. I’m always looking for new ideas, therefore, I think I’m going to try your method. Thank you for that fresh idea. I will let you know how I made out.
Hi, Shaa. Yes, please. I’d love to know what you think!
Very helpful. Thanks, Jan, for sharing the visuals. The date thing will help me tremendously, because sometimes I end up moving a scene and having a “time” label would help me ensure that where I move it “fits.” I’ll have to figure out the flag thing. I like that, too. It’s helpful to see other writer’s processes.
I’m so glad you found something practically helpful, Deborah. Thanks for letting me know!
Hi Jan, this is cool! I had already colour-coded my scenes according the point of view characters, but I had not realised you could switch the colours on in the binder. So, with one click my point-of-view chart was ready. Beautiful, thanks a lot!
This post will be saved in my notes!!
J, it was a recent discovery for me, too. Glad to pass it on!