
Creating Collections in Scrivener 3
By Gwen Hernandez | August 31, 2019 |

Looking for a way to view or store a group of your documents in a Scrivener project without losing their order in the Binder? If so, read on to learn about collections.
Introducing Collections
In Scrivener, a collection is a subset of your project’s documents that share the criteria of your choosing. For example, you might have a collection composed of all documents that haven’t yet been started, or all those where a specific character is mentioned (helpful for creating a series bible on a series you’ve already started).
Scrivener offers search collections—updated dynamically based on saved search criteria—and standard collections, curated manually by you.
Understanding Search Collections
Whenever you run a project search, Scrivener automatically creates a search collection called “Search Results” that stores the most recent search criteria so you can quickly run the last search again.
But what if you perform a search frequently, but it’s not always the most recent one? No need to recreate the criteria every time, you can save the search as a collection!
A few popular ideas for search collections include documents that share a particular keyword, author, blog location, storyline, setting, timeline, revision status, or point-of-view character.
Let’s create our own search collection.
Running a Project Search
The first step is to run a project search. In this example, I have a story that takes place across three different points in time but isn’t written chronologically. I want to create a saved search to isolate the scenes from 1990 so I can read them through for continuity.
Here’s how:
- Click the Project Search button in the toolbar (looks like a magnifying glass). A text box appears just above the Binder.
- Enter the search criteria in the text box. For our example, 1990.
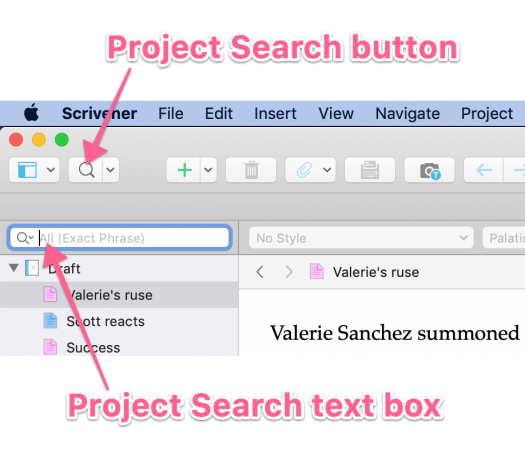
- Click the small magnifying glass inside the text box to make any adjustments to where or how the search operates. A list of documents that match the criteria appears in the Binder.
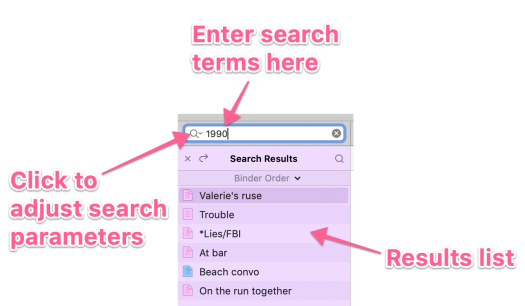
At this point, you can select any document to view it and see the matching word(s) highlighted, but we want to make a collection, so we’ll skip that part.
Creating a Collection from a Saved Search
If you got the results you were looking for, you’re ready to save the search with the following steps:
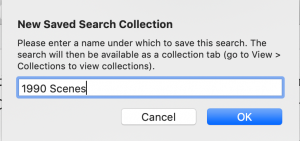
- Click the magnifying glass in the search text box and choose Save Search as Collection.
- Enter a collection title in the New Saved Search Collection text box, and click OK.
 The sidebar changes colors and the search results header now displays the collection title with a small magnifying glass to indicate that it’s a search collection.
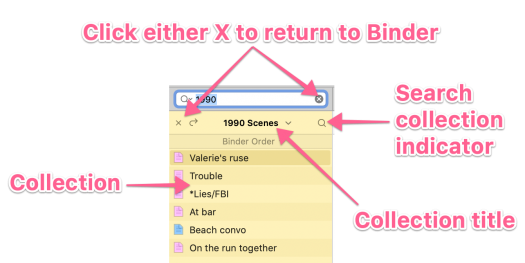
- To clear the search box and close the collection (i.e., return to the Binder), click the X in the search box toolbar (or the X at the upper left of the collection list).
Viewing/Hiding the Collections Pane
To view your collections, click the Show/Hide button at the far left of the Binder and choose Show Collections, or go to View>Show Collections.
A pane opens above the Binder to display the list of collections. 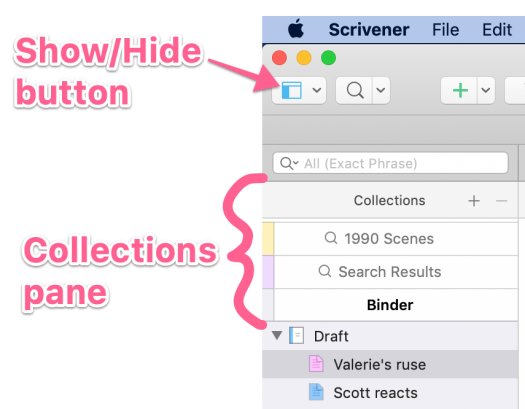
Hide the Collections pane the same way, but choose Hide Collections.
Adding a Standard Collection
If you want a collection of files that’s not based on a search, you can create a standard collection. The contents don’t change unless you add or remove files manually.
To create a standard collection, do the following:
- In the Binder, select the files to include in the collection.
- Right-click and choose Add to Collection>New Collection (or go to Documents>Add to Collection>New Collection). Alternatively, if you have the Collections pane open, you can click the + button. If not already visible, the Collections pane appears, and the Binder displays the new collection.
- Type in the name for the new collection and press Return.
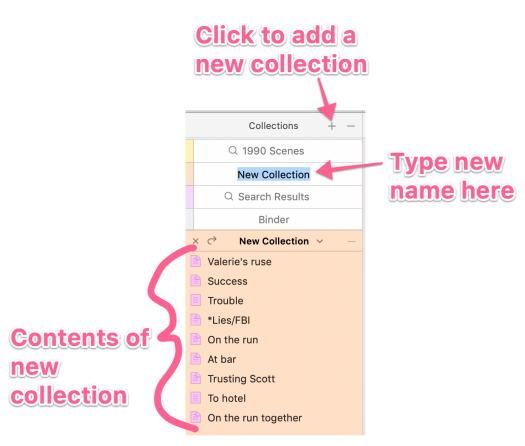
TIP: You can create an empty collection for later use by clicking the + button without selecting any files first.
Adding Files to a Standard Collection
To add a file to an existing collection, right-click the file in the Binder and choose Add to Collection>[the collection name].
Alternatively, if the Collections pane is open, you can drag a file from the Binder onto the desired collection.
TIP: Both of these options work for a selection of multiple files.
Removing Files from a Standard Collection
To remove a file from a collection, do the following:
- View the desired collection.
- Select the file(s) to remove.
- Click the minus [-] button at the top right of the collection (not the one at the very top of the Binder). The desired files are no longer part of the collection.
Reordering a Standard Collection
To change the order of files, simply drag them into the desired order. This is a great way to play with scene/document order without making permanent changes in the Binder.
Changing a Collection’s Color
If you don’t like the collection’s assigned color, do the following:
- Select the collection in the Collections list.
- Click the drop-down arrow to the right of the collection title.
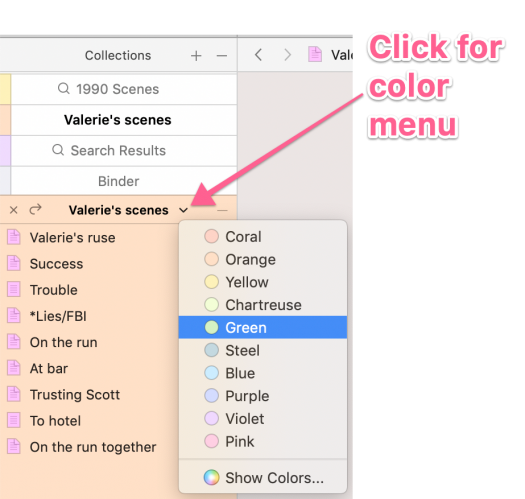
- Choose the desired color.
Renaming a Collection
To rename a collection, double-click its title in the Collections pane and type the new name.
Removing a Collection
To remove a collection, select it in the Collections pane and click the minus [-] button in the Collections header, shown below. 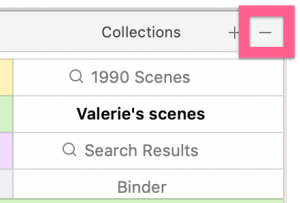
Reordering the Collections Pane
To change the order of the Collections list, simply drag a collection where you want it to go in the list.
Viewing a Document in a Collection
While displaying a collection, you can view the contents of a single document in the Editor by selecting that document in the list.
Viewing the Contents of a Collection
If you’ve created a collection so that you can focus on a subset of files for organizing or reading through, you’ll be happy to know there’s a way to quickly view all the contents of the collection’s files in one of the group view modes. Here’s how:
- View the desired collection.
- Click the right arrow at the top of the collection.
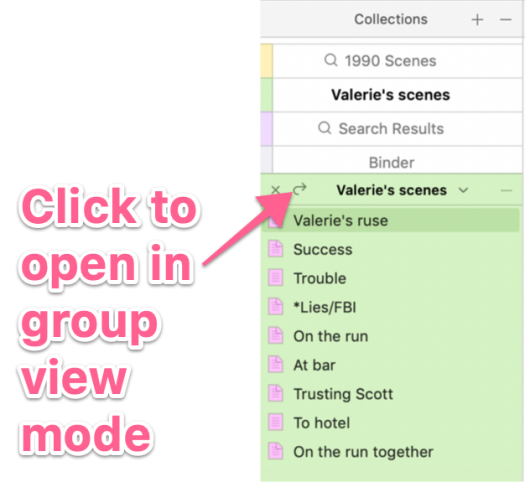
- Choose a group view mode from the toolbar or the View menu.
That’s the quick overview! Got questions about collections or Scrivener in general? How might you use collections for your process?
[coffee]
Gwen Hernandez (she/her) is the author of Scrivener For Dummies, Productivity Tools for Writers, and romantic suspense. She teaches Scrivener to writers all over the world through online classes and an extensive library of blog posts. Learn more about Gwen at gwenhernandez.com.


What a resource! Thank you for this, Gwen.
Absolutely, Therese. Thanks! :-)
Thank you! What you’ve written I can understand. I often like to read through single POV to check for voice continuity and other issues. Other times I want to focus on a group of scenes that occur in the same location. Up until now I’ve simply selected them to do the work. That works fine, but since they aren’t saved if I wish to breakaway to work on something else in the story the minute I do so my unofficial collection reverts to individual files. Collections fix that problem, but until now I was a bit intimidated. Thanks again!
Those are great uses for collections, Christina. I’m so glad you feel confident enough to use them now!
Thanks, Gwen. Handy tool. This is a saver.
Thank you, Annette!
Thank you for this article, Gwen. I have not been paying much attention to Scrivener for quite some time now. Yet I still have the writing itch. This article spurred me to open Scrivener, update it to version 3.1.3, and start reading one of my unfinished projects. I see how collections can help me. I wonder if collections can also search linked Aeon Timeline projects. Don’t worry about answering this one, my Aeon Timeline license is old enough to apply for a retirement pension, and I need to re-learn both Scrivener and Timeline. I’ll have to take another of your beginner classes.
Hi, Bob! I’m glad I at least got you back into your manuscript. I haven’t tried to use collections with Aeon Timeline, but if the timeline elements are visible in the Binder, I’d expect they could be “collected.” Try a quick project search to check. Good luck picking up the writing!