
Revising Your Manuscript in Scrivener
By Gwen Hernandez | June 29, 2019 |
I frequently get asked how to use Scrivener for revisions. Obviously, the specifics will vary depending on your approach to edits, but I’ll cover my basic system and give you some ideas which features you might find helpful.
Deciding Where to Revise
I make all of the suggested changes from my editor/beta reader/proofreader directly in Scrivener. A second monitor is helpful for referring to their comments, but I no longer have one, so I either divide my screen with the editorial notes document on one side and my Scrivener project on the other, or I open the notes on my iPad.
But what if you’re working for a traditional publisher who wants you to respond to comments and make your revisions within the Word document for continuity? (This was my process for Scrivener For Dummies.) At this point, you may be done with Scrivener until the next book. I’d make the changes in Word and then import the final version of the manuscript into Scrivener for future reference.
For those times when I have full control of my process, there are three main tools I use to help me with revisions: annotations, snapshots, and labels.
Adding Annotations
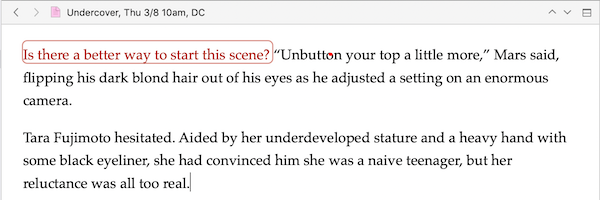
Annotations are a tool I use while writing to leave myself notes for when I’m ready to revise. I mark up areas that need something (e.g., more research, a conversation I’m not ready to write), or where I’m not 100% happy with what I have, but haven’t figured out how to make better (e.g., catchier opening line, better chapter-ending hook, snappier dialogue).
An annotation is inline text that shows up in a colored bubble, like the image below.
When I’m ready to deal with all of my annotations, I can just go to Edit>Find>Find By Formatting and step through them. Or, I handle them as I’m doing a read-through of the manuscript.
Comments work in a similar way. If you prefer to keep your notes in the sidebar, and don’t want them embedded within the text, comments might be a better option for you.
For more info, check out this earlier post that covers annotations and comments in more detail.
Taking Snapshots
Snapshots are a method for keeping older versions of a document. Anytime I’m going to make significant changes to a scene—whether during my initial (horrifying) writing process, or later during revisions—I take a snapshot of the document I’m about to edit.
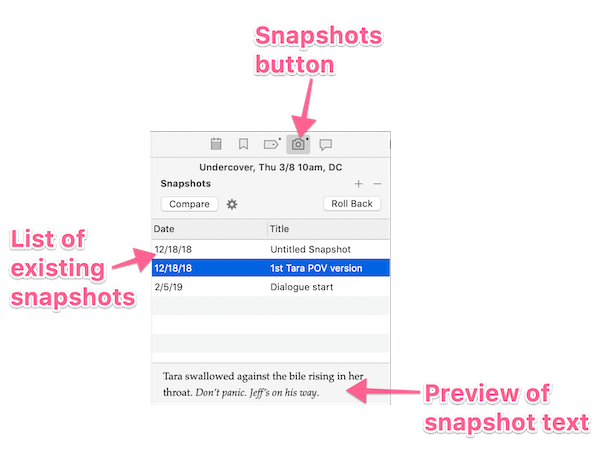
A snapshot (Documents>Snapshots>Take Snapshot) is a copy of the document as it is right now, that gets saved as part of the document’s meta-data. It’s a great way to keep track of different versions of a scene or section without cluttering up your Binder with files. I rarely go back to an old version, but I like knowing I can find my original words, if necessary.
If you’re worried about forgetting, you can select all of the documents you expect to work on that day and use the Take Snapshots of Selected Documents command to capture all of them. The snapshots for a document are viewable in the Inspector. Just click the camera icon at the top.
You can quickly tell if a document has at least one snapshot because its paper icon changes to a dog-eared paper icon. This post has more detail on Snapshots.
Tracking Revision Progress with Labels
When I’m in the early revision stages—essentially before sending to my editor—I don’t keep track of my editing passes, though you certainly can. If you’re very methodical about it, making one pass for emotion, one for setting, and so on, you might want to use my post-editor method for all of your revisions, using additional label values.
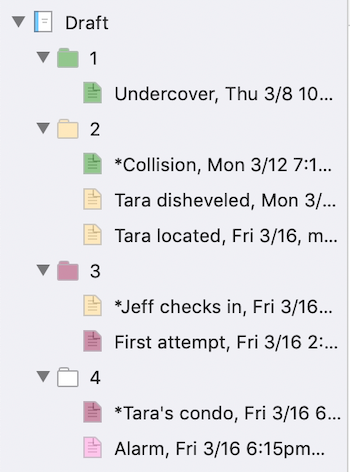
Once I have my editor’s comments in hand, I want to make sure I know which documents I’ve finished and which ones still need work. I accomplish this by changing the use of the Label field from point of view (what I generally track when I’m writing fiction) to edit stage.
Then I create labels that apply to each of the rounds I intend to make. Yours might look something like the following: Post-Editor Done, Post-Beta Done, Final.

I always have icon colors turned on (View>Use Label Color In>Icons) so I can see the editing status of each document at a glance.
If you’re already using the Label field to track something else important, you can use the Status field in a similar way, but it doesn’t include colors. Status values can be displayed in the Corkboard or Outliner instead. This post has more on how to use Label and Status.
Working in Full Screen Composition mode
To avoid distractions, I usually work in Full Screen/Composition Mode (View>Enter Composition Mode on a Mac, or View>Enter Full Screen on Windows).
To start, I select my first document, enter full screen/composition mode, click the Inspector button (in the control strip, accessible by pointing your mouse at the bottom of the screen), and move the Inspector somewhere out of the way.
Then, it goes something like this:
1. Make changes to the document.
2. Change the label value in the Inspector to show that the document has been edited.
3. Use the Go To button (in the control strip) to navigate to the next document I want to edit.
4. Repeat.
This process means I don’t have to exit full screen/composition mode—or break my focus—when I want to label a document and switch to a new one.
These are my favorite tools for revisions. What are yours? Got any questions on this or other Scrivener topics?
[coffee]
Gwen Hernandez (she/her) is the author of Scrivener For Dummies, Productivity Tools for Writers, and romantic suspense. She teaches Scrivener to writers all over the world through online classes and an extensive library of blog posts. Learn more about Gwen at gwenhernandez.com.


Oh, thanks for these, they’re invaluable, as is Scrivener. I’ve only made a serious effort to Compile once and it was a ton of trial and error, with a ton of errors. Still, it doesn’t come out like I’d like. For all that drafting and editing is unbelievably easy in Scrivener, Compiling never feels intuitive to me and the terms they use baffle me.
One little editing trick I’ve used is selecting multiple scenes. When using multiple POV there are times I want to edit more than one of the POV’s scenes all at once. If I hold down the Command button and click I can select multiple scenes and Scrivener temporarily stitches them together (dashed lines between). I then go into Composition Mode and edit.
There are other times I require two scenes up at once and the toggle for split screen is virtually effortless. I haven’t found a way to use it in Composition Mode, but if I want a similar effect I can shift the editor to one side and bring up a Quick Reference Panel (floating screen) with the desired scene.
Christina: Compile definitely takes some practice and iterating to get what you want, and it’s hard because most people don’t use it enough to remember what they last time.
Those are great ideas. What you’re talking about is viewing multiple documents in Scrivenings view (View>Scrivenings), and I use it constantly. Split screen as well, though as you’ve found, Composition Mode doesn’t support split screen. Glad you’re enjoying writing in Scrivener!
Good article! Here’s the latest blog contribution I made about revising in Scrivener. I mention the same features, but also added a couple more. Check it out: https://www.literatureandlatte.com/blog/revising-your-nanowrimo-novel
Thanks, Rebeca! It’ll be great when all of those features are available for both platforms. I especially like Focus mode.
Gwen,
You the woman! Boy, you know your stuff. Very informative, but to be honest, it can at times be complex like Labels, Status and MegaData. I love what you explained about Snapshots. Can’t wait to start using it.
Thanks Gwen. Glad we all have someone to go to that knows her stuff.
LOL, thanks, Annette!
It seems to me that a friend, a novelist, received a fully marked up doc back in Word from his editor (this was a couple of years ago, even), and was able to import it into Scriv. The editor’s comments went into the comments fields in Scriv and I’m not sure what happened to the markups but they were fully accessible…maybe as annotations, maybe just highlighted? Anyway, he showed it to me and I had the impression that you COULD work back and forth between Scrivener and Word without having to surrender your doc to the Word process once the ed send back a doc marked up in Word.
Hi, Claudia. In my experience, the comments will come through without issue. The markups are a little trickier. Basically, unless you’ve accepted all the changes and are importing the final version, Scrivener will see the original text and the added text, and so it can be a bit messy if the editor deleted and added in a bunch of places.
So, you could make it work if you were able to accept/reject all markups before importing, and leave the comments there. Or, if the editor only added new things, like commas. Also, Scrivener comments will export as Word comments, so that works both ways. In my case, the publisher wanted to see a history of all changes, so I had to do that in Word. I still imported every version to Scrivener to keep it all in one place though, and to use the color coding to keep me on track. Thanks!
Quick update: I just noticed in the newest version of 3.1.3 (end of June 2019), this statement: “The native .docx importer now correctly reads text inserted in Word during Track Changes.” So, I’ll have to test it out, but hopefully it’s going to work now!
Sorry to say I gave up on Scrivener. I took part in webinars, etc., and have never been able to make it work for me. Love the concept but …
It’s not for everyone, Irene! :-)
I’ll try the inline annotations, but the way I work, I have to keep it simple. The beauty of Scrivener is that you can find unconventional ways to work.
For example, I’m doing a final editing draft on my novella, and I discovered I can create a blank file with the headline a note of one important thing to remember. For example, a character was wounded in the cheek, so I created a blank page called “cheek wound.” After each chapter, I move the new one above my notes, so I’m reminded as I write what I need to add.
Thanks for sharing your method, Bill! I agree that Scrivener’s beauty is its flexibility. There’s an option that works for pretty much everyone’s process. :-)
Gwen, you’re my go-to for puzzling out Scrivener ideas. I love the snapshot idea and will incorporate that going forward. Until now, I’ve used separate docs (Draft 1 of xyz, Draft 2 of xyz) etc. Is there a way to take each of those and create a snapshot to then add to my working doc xyz? That way I could have all of those previous drafts as snapshots instead of the stack of docs in my binder. So much tidier.
Aw, thanks, Barbara! What you want to do could be a little time consuming, but it would get the job done.
1. Take a snapshot of the current version of a document (just to make sure you have it). Maybe name that snapshot as “Current” or something similar.
2. Delete the text.
3. Paste in the text of the older version. Take a snapshot.
4. Repeat that process until all older versions are in Snapshots.
5. Once all the versions are in Snapshots, you can use the Roll Back button to restore your current text.
I hope that makes sense. Feel free to follow up with any questions.