
4 Ways to Make Notes in Scrivener
By Gwen Hernandez | October 29, 2017 |
Do you write sticky notes for revision ideas? Or maybe you add words in caps or use TK to mark spots that need fixed or require additional research. No matter what type of note you want to leave for yourself, Scrivener has an option that makes it easy to mark up your text and find your comments easily when you’re ready to deal with them.
Annotations and comments allow you to leave notes at the exact spot that needs attention. Document and project notes give you a broader scope.
And, you can use any or all of them in combination.
These are great tools to use during National Novel Writing Month—or anytime—to keep you focused on writing rather than researching, or from thinking too long and hard on your words. Stuck? Make a note and move on.
Notes are also great when you want to tag a section of text.
BONUS: If you’re visually oriented, don’t miss the fully captioned instructional video at the bottom of the post. ;-)
Annotations
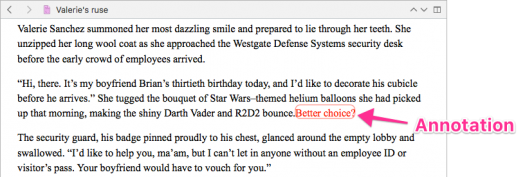
Annotations are inline comments, meaning they are specially formatted text that’s embedded in your manuscript. I like to use annotations to mark places where I need more research, or when I can’t think of the perfect dialog or wording.
Annotations let you mark the problem at its source so you don’t forget about it and you can focus on writing.
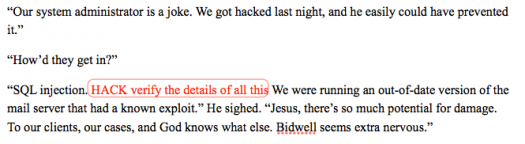
To narrow the results when searching for annotations, you can add a word or set of characters at the beginning or end. For example, all the areas where I have gun questions, I added the word “gun” (brilliant, right?) somewhere in the annotation. When I’m ready to compile a list of questions for my gun expert, I can limit my search to annotations that contain the word “gun” and ignore the rest. (More on searching in a minute.)
I also use annotations to mark sections that might make good excerpts for marketing graphics.
Pros:
– Easy to spot.
– Easy to search (and narrow by text or color).
– Can be excluded when compiling (on the Footnotes & Comments tab), which means you don’t have to remove them before sending a manuscript to your agent/editor/beta reader/online retailer.
– Can be included during compile, if desired. You choose the bracketing character (e.g. [annotation here]).
Cons:
– Might be a little too “in your face” or distracting.
– Cannot view all of them at once.
– Can be searched by color, but changing colors isn’t simple.
Inserting an Annotation
Here’s how to insert an annotation.
1. Place your cursor where you want to insert the annotation.
2. Go to Format>Inline Annotation. Nothing appears to happen.
3. Start typing to see the specially formatted annotation text.
4. Go to Format>Inline Annotation to turn off annotation formatting and get back to writing.
TIP: If you find you use these frequently, memorize the keyboard shortcut to turn this mode on/off (Shift+Command+A on the Mac, Ctrl+Shift+A on Windows).
Comments
Comments can serve the same function as annotations, but their placement is different. They’re similar to Word comments in that they show up in boxes in the sidebar, and can be hidden.
When you add a comment, it’s attached to the nearest word, which is then highlighted to show that it has an associated comment.
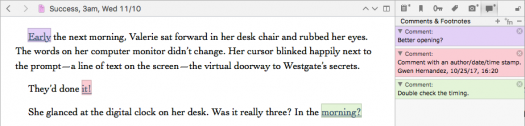
Clicking on the highlighted word opens the Comments & Footnotes pane in the Inspector to display the linked comment. Conversely, clicking the comment in the Comments & Footnotes pane navigates you to that location in your document.
Changing comment colors is as easy as right-clicking (or Control+clicking on a Mac) the comment box and choosing a new color. You can search comments by color, so you could assign different colors to different types of comments, or even different people if you’re collaborating.
Comments can also be searched by specific text.
Pros:
– Less visibly distracting than annotations.
– Easy to change comment colors.
– All comments for a document can be viewed as a list in the Comments & Footnotes pane.
– Easy to search (and narrow by text).
– Can be excluded when compiling (on the Footnotes & Comments tab).
– Can be included during compile if desired. When sent to a Word DOC/X, will import as Word comments.
Cons:
– Requires an extra step to view (though you can point to a highlighted word to see the comment in a text popup).
– Not as visible if you prefer high-vis notes; easier to miss when scrolling through.
Adding a Comment
1. Insert your cursor in the text where you want to position the comment link.
2. Go to Format>Comment (or click the Comment button on the toolbar). If it’s not already, the Inspector opens to the Comments & Footnotes pane with a comment bubble containing the author name and date/time stamp.
3. Start typing to overwrite the name/date/time stamp with your comment. If you want to preserve the name/date/time, use the arrow keys on your keyboard to move the cursor to the right or left and then start typing your note.
4. To return your cursor to the spot where it was in your text in the Editor, press the ESC key on your keyboard. Otherwise, you can click anywhere to exit the comment box.
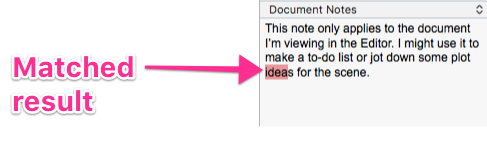
Document Notes
Document notes are notes associated with a specific document, but not a specific point in the document. So, if you had an idea for a change in character motivation in the scene, you need more research on a topic in order to write or revise the document, or you want to create a quick outline of the scene or article you’re writing, document notes are a good choice.
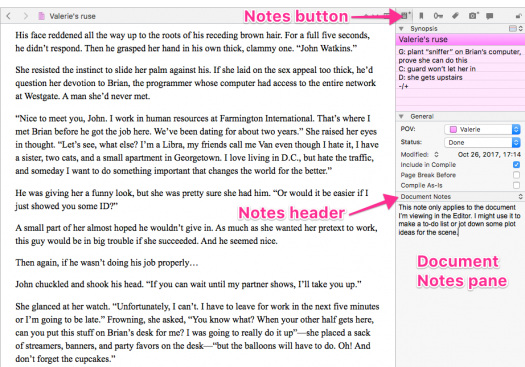
These notes appear in the Notes section of the Inspector pane. To view or edit them anytime, select the desired document in the Binder, make sure the Inspector is showing (if not, click the blue “i” button in the toolbar), and click the Notes button at the top.
If the Notes header says Project Notes, click on the header to get a menu and choose Document Notes.
Project Notes
Project Notes are visible from any file in your project, and thus apply at the project level. Project notes are best used for high-level thoughts, lists, or ideas that apply to the manuscript as a whole.
This could be a to-do list, a quick-access list of characters/traits and locations that appear in your manuscript (my most common use for fiction), or plot ideas for future scenes. Whatever you want.
Project notes appear in the Notes pane of the Inspector, just like document notes. To toggle to project notes, click the Notes header and choose Project Notes.
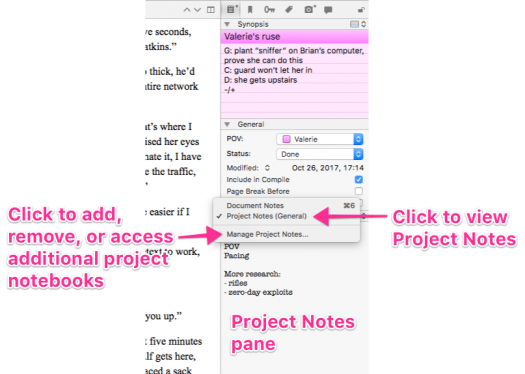
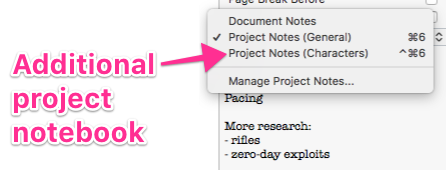
You can even create multiple project notebooks by clicking Manage Project Notes on the Notes menu. Then, all of your project notes will become options on the menu.
TIP: Another option is to create a Notes folder in the Binder and add a document for each type of project note you want. In fact, in Scrivener 3 (out this year for Mac and next year for Windows), project notes will migrate to exactly this setup.
Finding Your Notes
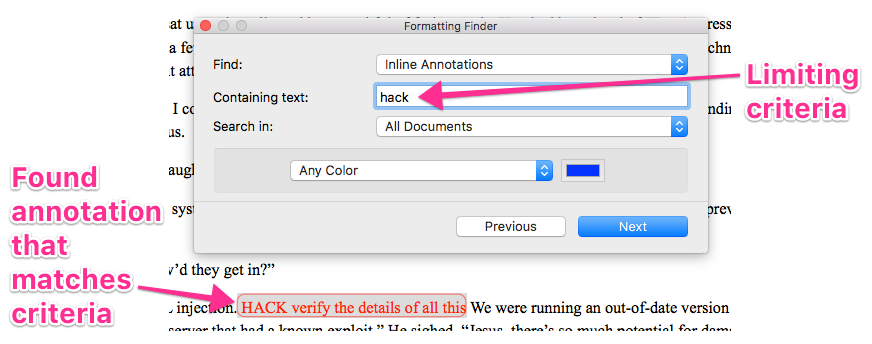
Using Find by Formatting for Annotations and Comments
When you’re ready to deal with all or a subset of your annotations or comments, you’ll work with the Find by Formatting feature.
1. Go to Edit>Find>Find by Formatting.
2. Adjust the criteria as desired.
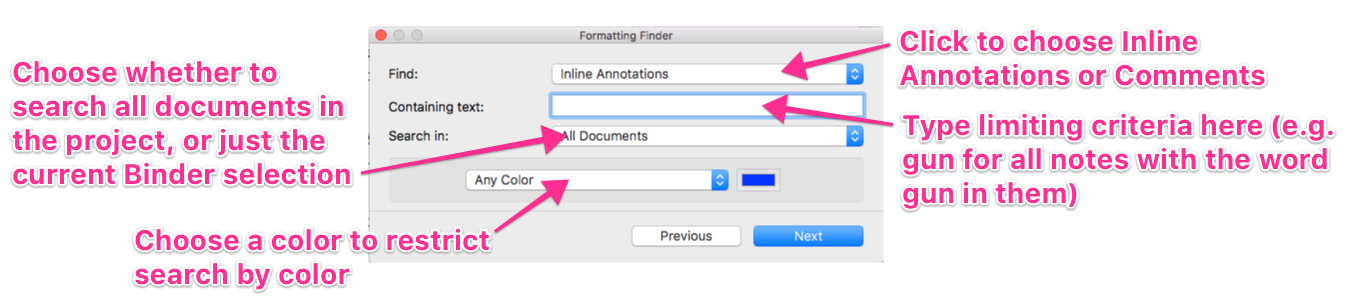
3. Click Next to find the first match. Click Next again to find the next one.
Using Project Search for Document Notes
Document notes are searchable via Project Search.
1. Click in the Project Search text box in the toolbar.
2. Type the word or text you’re trying to find.
3. Click the magnifying glass icon in the text box to limit the search to Notes.

4. The Binder changes to a list of documents that matched the search criteria. Click on each document in turn and view the Document Notes pane in the Inspector.
Searching Project Notes
Project notes can only be searched from within the Project Notes pane. Here’s how.
1. Click inside the Project Notes pane.
2. Go to Edit>Find>Find (or use Command+F on the Mac, Ctrl+F on Windows) and enter the search text in the Find text box.
3. The first matching text is highlighted. Click Next to iterate through matches.
For those who like video instruction, I’ve created a one that walks you through the four types of notes and searches. Enjoy!
What questions do you have for me? Do you find any of Scrivener’s note options helpful in your own work?
[Edited 10/31/17 to correct mention of searching by color for comments, which Scrivener does not support.]
Bonus Video [CC] – 11:25 minutes (Best viewed in full screen. If it looks fuzzy, give it a minute.)
https://youtu.be/ASAzWYprhiw
Gwen Hernandez (she/her) is the author of Scrivener For Dummies, Productivity Tools for Writers, and romantic suspense. She teaches Scrivener to writers all over the world through online classes and an extensive library of blog posts. Learn more about Gwen at gwenhernandez.com.


This is so helpful! I only use the project/document notes and had no idea you could add in comments. I’m going to start using this right away. I always learn something new from your Scrivener posts. Thank you!
Great, Cheryl! There are so many cool tricks in Scrivener. It’s my mission to share them all. ;-) Thanks!
Another excellent post Gwen. I learned a ton at your SiWC workshop too! Thanks for sharing your knowledge!
Thanks, Sheri! SiWC was fabulous. :-)
Thanks for,the reminders. I’m not planning my manuscript as much as I’d like this year, so these will jelp!
No problem, Tammy. Glad to hear it! Good luck with the manuscript.
Great mini tutorial Gwen! Very helpful!
Thanks for letting me know you found it helpful, K.L.!
Appreciated this post. I always learn something from you, whether in a post or a workshop. Thanks for your efforts in keeping us informed.
Thanks, Sherrey! Always happy to help.
Gwen.. All I can say is Wow! “Notes” caught my eye. Jumped past the header. Half way though I thought, — This is the sort of thing Gwen would write. Scrolled back to the top… Sure nuff, it was Gwen. You are really some kind of good at this.
LOL, thanks, Curtis!
One of the reasons I love Scrivener is because it’s given me a place to put my 1000 stickies. But I had no idea about the comment option and have never tried annotations. I can see their value.
“I also use annotations to mark sections that might make good excerpts for marketing graphics.”
^^A brilliant idea. Thanks, Gwen. Was nice to meet you at SiWC. Would have loved to have taken your workshop but I needed a clone in that time slot! (As I did for many.)
Jan: I’m glad you found something useful. It was great to meet you in person. I wish we’d had more time to chat. Thanks!
Thanks for all of this. Scrivener is a HUGE resource and I always feel as if there’s more to learn. Saved this post to refer to it over and over again!
Absolutely, Carol. There *is* always more to learn, LOL, but the good news is you don’t need it all at once. ;-) Thanks!
I’m up and writing before my family wakes. Thank you so much for this; I’ve been fumbling my way through learning Scrivener, and this note-taking info is just what I needed. Have a great day.
Great job getting up early, Julia! I’m glad to hear the post helped. Hope your writing goes well.