
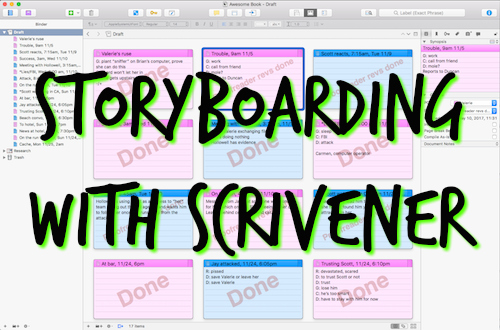
Storyboarding with Scrivener (or, A Love Affair with Virtual Index Cards)
By Gwen Hernandez | July 30, 2017 |
 Whether you’re a plotter or a pantser—or neither—at some point in your writing process, you can probably benefit from a visual overview of your story. Scrivener’s Corkboard feature is here to help.
Pack up your paper index cards and colored sticky notes, and let’s go virtual.
Understanding Index Cards in Scrivener
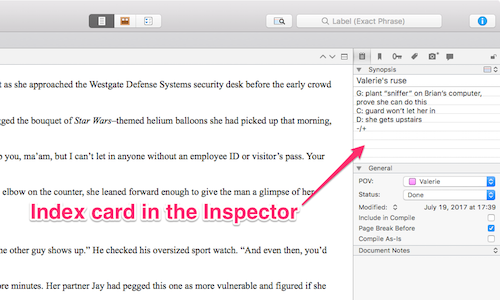
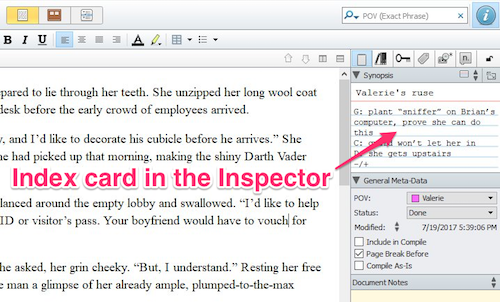
Every file in Scrivener has an associated index card. That index card shows up in the Synopsis section of the Inspector (visible in all but the Snapshots and Comments panes), and on the Corkboard. You can use the index card to make note of anything you want—for example, the timeline, setting, characters—but for storyboarding purposes, it makes sense to include a brief synopsis of the scene.
Mac
Windows
Viewing the Corkboard
To view the Corkboard in a Scrivener project, select any folder (or a selection of multiple files). If you don’t see index cards representing the documents in that folder, go to View—>Corkboard.

Mac

Windows
The Corkboard view only displays the top level within each folder, so if you have your scenes organized into chapter folders, all you’ll see when you select Draft is index cards for the chapter folders. There is a way around it, but this is one reason you might want to delay organizing your scenes into chapter folders until you are done with your first draft. For more on that, see this post about organizing your files.
Building Your Story in the Corkboard
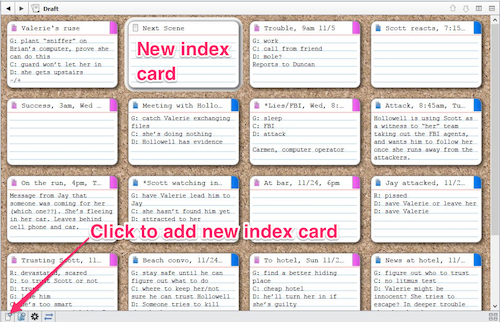
Rather than adding new documents in the Binder, you can add them directly in the Corkboard. This allows you to create placeholder cards for each scene, add a synopsis, and then create another until you have your story plotted out.
You can even move cards around in the Corkboard to play with the order of your scenes. Here’s how to add additional cards.
1. Select any card in the Corkboard. (If you don’t have any index cards/documents in the selected folder yet, this will still work. Selecting an existing index card just lets you control placement of the new card.)
2. In the Corkboard footer, click the Add New Text button (see image below), or click the Add button (green + symbol) in the toolbar. A new card appears after the selected card.
A corresponding new document also appears in the Binder.
3. Type the name of the new scene and press Return.
TIP: You can also select a card (single click) and press Return to add a new card after/below it. (This works the same as selecting a document in the Binder and pressing Return.)

Mac
Windows
Renaming a Document in the Corkboard
Double-click an index card’s title to change it. This changes the document title in the Binder too.
Adding Text to an Index Card
Double-click in the synopsis text area to add text. While the synopsis text section is active, you can use Tab to move through the cards.
TIP: Mac users, to force a new line within the text of the card, use Option+Return. Windows users can just press Enter.
Viewing the Associated Document
To view the document associated with a card, simply double-click the card’s icon (to the left of the title). Scrivener switches to the Editor to view the selected document.

Viewing the Corkboard in Split Screen
Let’s say you’ve created index cards for your next few scenes, but haven’t actually written the scenes. While writing, you want to be able to refer to the synopses on multiple index cards. The answer is Split Screen.
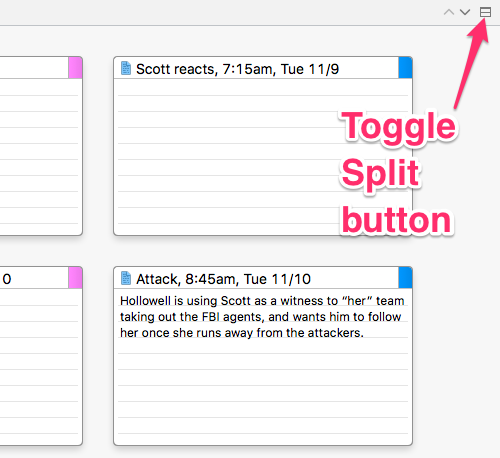
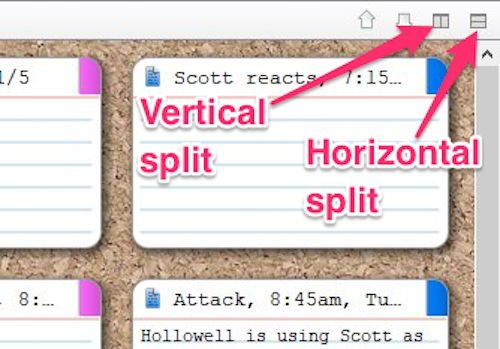
1. While viewing the Corkboard for the desired folder, click the Toggle Split button (Mac) or Horizontal or Vertical Split button (Windows) at the far right of the header (see image below).
(Mac users: You can change the horizontal split to vertical—or vice versa—by holding the Option key.)
Mac
Windows
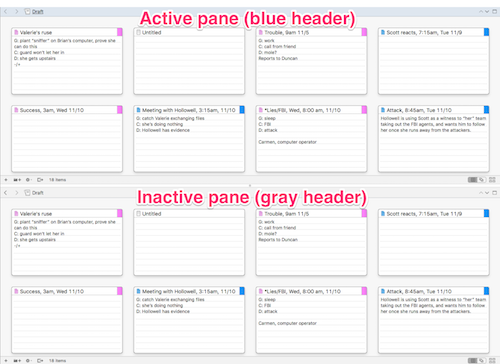
Initially, both panes will display the Corkboard.
Mac
Windows
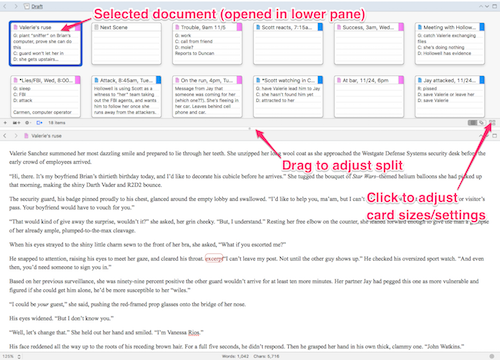
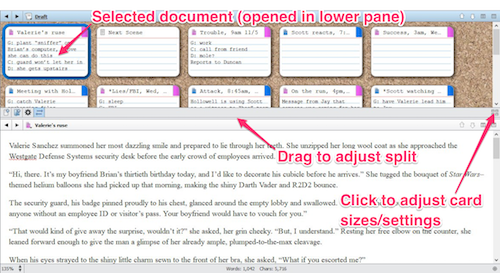
2. Click in the lower pane (or the one where you want to write). The header should turn blue to show it’s the active pane.
3. In the Binder, select the document you want to work on. The document appears in the active pane.
 To exit the split, click the Toggle Split button (Mac), or the No Split button (Windows), located in the same place as the split button(s).
Navigating Documents in Split Screen
If you like working in split screen with the Corkboard, you can use the Corkboard as a navigating tool to open each document as you’re ready to work with it.
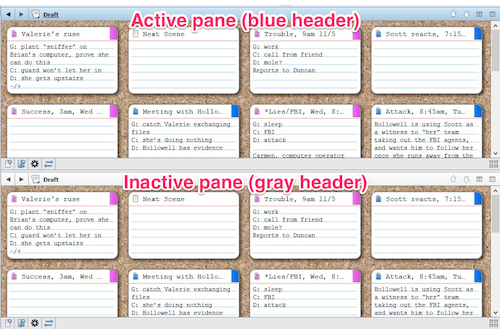
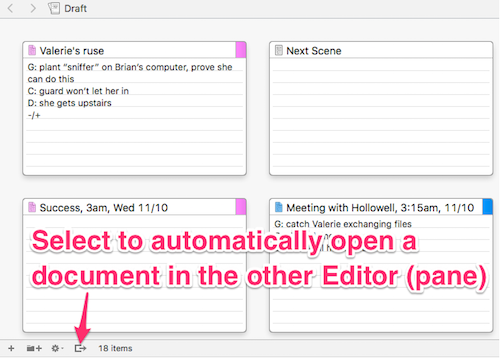
1. In the pane that’s displaying the Corkboard, click the “Automatically open selection in other editor” button (see image below).
Mac

Windows
2. Select (single-click) the desired document in the Corkboard.
The document opens in the other pane.
To make this work sort of like a dashboard, you could adjust the size of the index cards so the desired number of them fit in the upper pane, and adjust the size of each pane to your liking. Then, if desired, hide the Binder and/or Inspector.
Mac
Windows
Viewing Label Colors in the Corkboard
If you have labels applied to your documents, you can color your index cards by going to View—>Use Label Color In—>Index Cards. The colors will show in the Corkboard and the Inspector (see image in the Viewing the Status on Index Cards section below).
Repeat the above to turn the colors off.
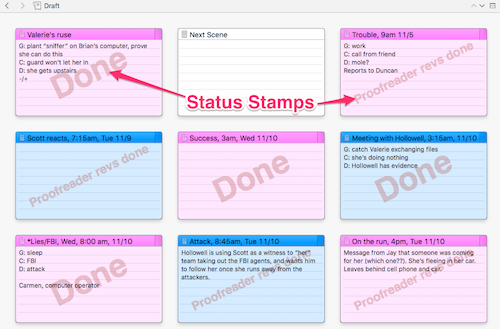
Viewing the Status on Index Cards
If you have statuses applied to your documents, you can view the Status value as a “watermark” across each index card. To turn this on, ensure you’re in Corkboard view and then go to View—>Corkboard Options—>Show Status Stamps (Mac)/Status Stamps (Windows).
Repeat to hide the status stamps.
 Happy storyboarding!
Questions? What else do you want to know about the Corkboard or Scrivener in general? Fire away.
[coffee]
Gwen Hernandez (she/her) is the author of Scrivener For Dummies, Productivity Tools for Writers, and romantic suspense. She teaches Scrivener to writers all over the world through online classes and an extensive library of blog posts. Learn more about Gwen at gwenhernandez.com.


Another thing I like about Scrivener is the Snapshot function. It allows you save the current state of the document and recall it at any time. These snapshots can be labeled to try different approaches.
After I completed the first draft of the novel, I went back and, one by one, snapshotted each scene, cleared the text out of it, and rewrote it using the snapshot as a guide. I used the status to track this progress and label to track point of view.
I love snapshots too, David. I take one anytime I’m about to revise a scene (though I don’t delete and start over usually). ;-) I also use Label and Status in a similar way. So handy. Thanks for sharing!
I just find that for the first revision that it is a lot easier for me to just start over rather than traditional revising. After the first draft I generally know what I want to say and running it through my head and fingers again is an easier way to revise. It comes from some advice from Emma Darwin, who suggests that you cut and paste manually, typing out the words again so that you have think about them again.
David: I love hearing about other writers’ processes. The main thing is to do what works for you. I do on occasion start a scene completely over so that I don’t get tied to the previous words. Depends on how much of an overhaul it needs. Thanks!
Thanks for explaining how to maximize use of the cards in such detail, Gwen. I adore the index-card feature. In fact, it’s that feature, seen through an iPad app called Index Card, that finally pushed me into buying Scrivener.
Absolutely, Therese! And now that there’s Scrivener for iOS, you can do this on your iPad with easy syncing. :-)
Great stuff, Gwen. I especially love changing to the free form mode on the corkboard, allowing me to move index cards around as I please, to see different relationships and sequences.
Thanks, James! Freeform mode is pretty cool. I didn’t mention it since it’s Windows only right now. Hopefully that’ll show up in Scrivener 3 for Windows. :-)
Ha–haaaaa!
I DUB THE Jedi Master Gwen-Scrivener. “Gwen-Scrivener” must be pronounced with a British accent. Brillant post, just brilliant, lady.
Oh oh, add this to your list. You mentioned Pantsers and Plotters, well now, you can start talking about Designers.
Hey BB, are you a pantser or plotter?
I’m neither. I’m a Designer.
LOL, thanks, Brian! I’ll take it, especially with the British accent. ;-) Please tell me more about what a Designer is. And thank you for making my day.
A Designer is a writer who follows the Story Genius method or something similar.
(It’s not really official, but I’m starting the rumor) Lol.
Thank you, Jedi master Gwen-Scrivenaa (with British accent)
Ah, thanks for clarifying. As someone who wrote that post on using Scrivener with Story Genius, I guess I should know that… Now I’m in the loop! ;-)
MTFBWY
I’m getting ready to start work on my next book. I’ll have to plan it without dividing the scenes into chapters, so I can take full advantage of the corkboard. I haven’t yet planned a book using Scrivener. I will this time. Thanks, Gwen. A very timely post.
Good luck with the new book, Barbara!
Thank You! 👍🏽
Absolutely, Russell! I appreciate you stopping by. :-)
Saving this one forever, Gwen. Thanks so much! I love those index cards!
LOL, Laura. Glad you found it helpful. :-D
I guess I never read up on this but what is with the G, C, and D in each index cards? This seems to be a better way to organize a scene, but I am not sure what those letters stand for.
Hi, Benjamin. I got that from Dwight Swain’s old-but-awesome book TECHNIQUES OF THE SELLING WRITER (specifically, Chapter 4). He says that each unit in your story should be a scene (action) or sequel (reaction), though I often combine them into one “scene.”
I probably don’t always use these 100% correctly, but it really helps me organize my thoughts around what’s going to happen next. Or, if I got carried away, helps me document what happened in the scene I wrote to ensure it makes sense to the story.
Scene elements
G: goal
C: conflict
D: disaster
Sequel elements
R: reaction
D: dilemma
D: decision
I also like Debra Dixon’s Goal, Motivation, and Conflict, which can work at the story level, but also at the scene level to ensure the scene has a purpose. So, you might also have seen GMC to represent those.
Hope that helps!
Just broke my promise not to buy more writing books, but at least I will be more organized.
LOL, Benjamin. Good luck with your writing!
What an excellent article. Thank you!
I’m using Scrivener and loving it, but I’ve learned a lot of new tricks with this post and know I’ll refer to it a lot.
Thanks, Sheri! Seems like there’s always something else to learn… 😉 Happy writing.
In my early author days, I used to buy a pack of index cards and use them for storyboarding. The cork board function in Scrivener is what made me buy it in the first place. I am looking forward to Scriv 3!
April: I’ve been beta testing Scrivener 3 for Mac. It’s familiar enough that you won’t feel like you’re starting over with a new program, but has some nice changes and new features. And it was a total overhaul under the hood. Happy storyboarding!
I haven’t yet used the index cards on Scrivener, but just might have to now.
I’ve been using the “comments” to note anything I need to look up or fix, but I can’t find a way to show all of at the same time. Thoughts?
Maybe I should use index card(s) in the future and put my notes there.
Hi, Leslie Ann! You can use Edit>Find>Find by Formatting to have Scrivener step you through each comment, but if you want to see all comments in one place, your options depend on which platform you’re on.
Mac: Select your Draft/Manuscript folder and go to View>Scrivenings to get into multiple document view. Then click the Comments & Footnotes button in the Inspector to see all of the Comments in the sidebar. You can click a comment to be taken directly to its linked word in the text. Mac users can also use the Windows option below.
Windows: Currently, there’s no option to view all the comments in one place within Scrivener, but you can export the comments to a separate document and refer to it on the side. To do so, go to File>Export>Comments & Annotations. Choose a name and location, and for easy navigating, select the box to “Include titles,” then click OK. Scrivener creates an RTF file (Word compatible) with the comments organized under the title of the document to which they’re linked.
HTH!
Thanks for the tip, Gwen. This was a great post, and I love reading the comments.
~LA
I think I started using Scrivener around 2010 and can’t imagine writing without it. Thanks for the tips today.
I feel the same way, Kristina. I’ve been working with Scrivener since 2009, and I can’t imagine using anything else. :-)
Actually, what I am in need of is a good template for a rather large family tree. If it is printable, that would be lovely and unfortunately, price may win out…Thanks and I shall look into the story board for my daughter as she is working on her second book but is a bit more organized than her old mother. :)
Léa: I don’t personally know of a family tree template, but you might check with the Scrivener for Genealogists Facebook group (https://www.facebook.com/groups/587581684645431/) or The Armchair Genealogist, Lynn Palermo, who has a book called Scrivener for the Family Historian (https://www.thearmchairgenealogist.com). Good luck!
Hi Gwen, Thanks so much for this great article. I also have your book Scrivener for Dummies and I’ve used it many times — it’s a wonderful resource.
I’m currently stumped about something. I broke my document into chapters and put my scenes inside them. Now I’d like to do a little more structuring and print out my index card synopses, but the corkboard will only let me view folders, not my individual scenes. You say above:
“The Corkboard view only displays the top level within each folder, so if you have your scenes organized into chapter folders, all you’ll see when you select Draft is index cards for the chapter folders. There is a way around it, but this is one reason you might want to delay organizing your scenes into chapter folders until you are done with your first draft. For more on that, see this post about organizing your files.”
What is “the way around it?” I don’t want to delete each chapter in order to get back my viewable index cards for each scene on one corkboard. I’m hoping there’s an easier way. I didn’t see an answer to this in the index card section of your book, but I might not be looking in all the right places.
Thanks for any advice you can give me.
Hi, Amy. Currently, “the way around it” only works for Mac users (I’m not sure why I mentioned it, sorry if you’re a PC). If you are a Mac user, you can use Command+click to select all of the chapter folders and view them as “stacked” corkboards. You can move cards within or between the cork boards, which are separated by a line (and alternating background colors).
If you’re on a PC, you might try using the Outliner instead. If you click your Draft/Manuscript folder and go to View>Outline, you can set it up to show only the title and synopsis (or whatever else you want), and then expand/collapse folders as desired to see their contents. In Outline view, you can drag documents between folders, and change any of the metadata (e.g. synopsis, label, status, etc). I hope that helps. Thanks!